Tuesday, February 25, 2014

Lucky Printables- FREE

I really enjoy cute printables. And I like them even more when they are FREE! I decided to make a few St. Patrick's Day printables for you. More will come in the next week or so. For now, enjoy these two 'lucky' prints. Made to be printed as 8x10 or smaller. Enjoy! 

*you are more than welcome to share these pictures and use them as you please.. just make sure to give credit back to me. Thanks!*


Monday, February 24, 2014

Framed Recipe

This is just a quick post. I just wanted to share a post about a special gift I got for Christmas. My sister in law Lisa gave all the girls one of these.

My husband's grandma lived to be 100. She had beautiful handwriting! I never actually got to meet her but from what I heard, she was a wonderful person. When she passed away, Lisa inherited the recipe book from her. For Christmas this year, she decided to take an original recipe and frame it for us. 


Sorry- the pictures are blurry, I took with my phone! As you can see, on the back of the frame, Lisa added a note about how the recipe is from grandmas recipe book and how beautiful grandmas handwriting was. 

Now I am going to raid my mom's handwritten recipe book so I can have a framed recipe of hers! 

Great way to decorate your kitchen right?! Also a great gift idea. Thanks Lisa! 

DIY Chalkboard from the Dollar Store


Don't you just LOVE The Dollar Store? I do. Every time I go there, I find something that I know I can make into something better. It's the times I go not looking for anything in particular that I actually come home with lots of fun things.

This dollar store project is a fun chalk board! 

*note* I had previously made this, but only put one coat on the chalk board. It eventually scratched because I used a piece of chalk that wasn't rounded. So These pictures are BEFORE I re did it. Now its great!*

You will need: 
Chalk Board Paint
Sponge Brush
Serving platters from the dollar store (the aluminum ones) 

I got my chalk board paint at Hobby Lobby in the paint section. I think it was only 2 or 3 dollars. 

Paint the serving platter like normal. Let it dry between coats. You will need a good 3 coats. 

Round out your chalk before you use it. If it's new just take off the straight edges. 

It says to let it dry over night, but you could get away with a few hours. The longer you dry it the better it will be before you write on it. Before you write anything, scribble all over the board and wipe clean to sort of 'condition' it.  I just did something simple. The possibilities are endless. 

I loved this project. It was really easy and only cost me a total of $4. 

What have you been making lately?

Monday, February 10, 2014

Valentines Day Nails

Oh goodness, I love Valentines Day.

In my home growing up my mom would make us handmade valentines. She would stick candy bars to a big cut out heart that said something clever. She also would do heart shaped pancakes. She just made it a special day for us. Now when I got older it wasn't as fun.. Single Awareness Day!

But now that I have my husband and two kids, its fun again! Of course I dont think Valentines Day is the only day of the year you should do special things for your loved ones or share your feelings. Do those every day. But it is fun to over-do it once a year! ;)

Something I love about Valentines Day is all the fun nails!! I recently started working at a Salon and will be doing nails as well. I have been looking at pinterest the last few days at some cute Valentines Day nails to get ideas on how to do my nails. Here are a few of my favorites:

source:http://allforfashiondesign.com/16-sweet-and-lovely-valentines-day-nail-art-design-ideas/

source: http://www.pinterest.com/pin/502292164661921416/

source: http://www.pinterest.com/pin/165859198749183531/
I think these would be my favorite. I am LOVING gold and red right now!

source: http://www.pinterest.com/pin/224335625162937816/

source: http://www.pinterest.com/pin/224335625162937816/

What's your favorite? 

Wednesday, February 5, 2014

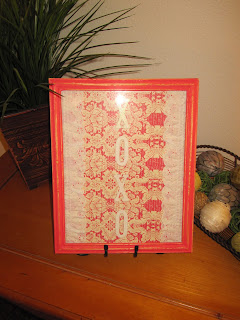
xoxo Dollar Store decor- Tutorial

Valentines Day is just around the corner. What are your plans?
My hubby and I scheduled a babysitter so we could get some grub and have some alone time. No idea what he has planned.. I have some fun things planned but I can't share till after. I don't want him peeking on here ;)

On Instagram a little while ago I posted that I would be sharing a tutorial on how to make this super cute Valentines frame. I apologize I haven't shared this sooner. Both my kids have fevers, coughs, runny noses, one just got 4 shots at his 6 month appt, and the other has a double ear infection. No fun! So I have been spending my time with my kids trying to get them better. They are sleeping- and now I get to do a little blogging and DIY!

Without further ado...
This is REALLY easy to make.
You will need:
Dollar Store WOODEN frame
 Acrylic Paint
Ribbon/fabric trim
chip board letters/stickers
Scrapbook Paper
Glue Gun

I first painted my frame and then distressed it.
I then chose a piece of scrapbook paper and glued my lace to the edges. I got my lace at Walmart by all the trimmings/ribbons in the sewing section. Then, the last thing I did was glue on my letters!
It really was that easy. You could use the words LOVE, KISS, BE MINE, etc. 


I love easy projects- and this one kinda tops them all!
Have fun making it! 

DIY Cork Board Transformation

I love me some thrift shopping. Don't you?? I don't always find something- but when I do, I get really excited. Here in Utah we don't have Goodwill (at least we don't by me) so D.I. or Savers is the best option. I usually find more at D.I. though. 

While shopping there not too long ago, I found this pretty banged up cork board. I think I only paid $1 for it.
 I knew this little beauty had potential. It even had a hook on the back so I didn't have to put one on myself. I had all kinds of ideas for it. Here is the before: 


What I chose to do is take out the cork and cover it with fabric. I used hot glue to glue the fabric on it. If the cork board was in worse condition, I could have gotten some cork at Hobby Lobby to replace it. Just FYI incase you ever need to replace yours.

 I decided to keep the color since I had some cute fabric that perfectly patched. I sanded it up a bit to add a distressed/vintage look to it since it would match the fabric better. 

This literally took me only 10 minutes. I love finding things like this. How cute would this be in a little girls room with some pictures pinned to it?! 

Thanks for following along! Get craftin'!